Featured image of post KubeVirt with libvirt/QEMU/KVM in Kind

KubeVirt with libvirt/QEMU/KVM in Kind

Getting started with KubeVirt in kind

Bridging the Gap Between Virtual Machines and Kubernetes with KubeVirt

This blog post will provide a brief introduction to the open source CNCF project KubeVirt. KubeVirt (alongside Kernel-based Virtual Machine (KVM)/libvirt/QEMU) is one of the foundational components included in OpenShift Virtualization. A more detailed relationship can be found on the Hyperconverged Cluster Operator for OpenShift Container Platform (OCP). While this blog post shall be focused on the upstream project KubeVirt, I have to provided full credit to OpenShift Virtualization along the lines, because most of my lessons learned are originated there.

If you are just interested in the demo, please head over to section KubeVirt with libvirt/QEMU/KVM in kind.

Why KubeVirt / OpenShift Virtualization?

KubeVirt / OpenShift Virtualization allows you to operate virtual machines (VMs) on Kubernetes / OpenShift. I have come across several different reasons why companies would want to look into this topic. Please let me elaborate on some reasons:

  • Migrate VMs to microservices at your pace
    • KubeVirt / OpenShift Virtualization can be an interim solution when you are migrating your workloads towards containers anyway and need to host them on your k8s based platform temporary. This is especially true when you are using the Migration Toolkit for Virtualization on OpenShift for the initial migration.
  • Legacy applications need VMs
    • Some applications might not be worth to modernize to container technology as their is no commercial benefit. Thus you will leave them as is in a VM until the end of the application lifecycle.
  • Reduce technology spread (Hypervisor + K8s / OCP)
    • Some companies are looking for a way to reduce the technology spread in their existing infrastructure.
  • Replace hypervisor and save costs $$$
    • The layer of a hypervisor is introducing additional costs on your infrastructure which can be avoided when using kubernetes / OpenShift on bare metal servers.
  • Need virtualization technology for certain requirements
    • Companies could be forced to use virtualization technology to comply with some of their requirements, especially in the realm of public and critical infrastructure.

Why OpenShift Virtualization instead of upstream KubeVirt?

From the above reasons you could think that OpenShift Virtualization might be fully interchangeable with KubeVirt. Nevertheless there are some key differences:

How does KubeVirt work?

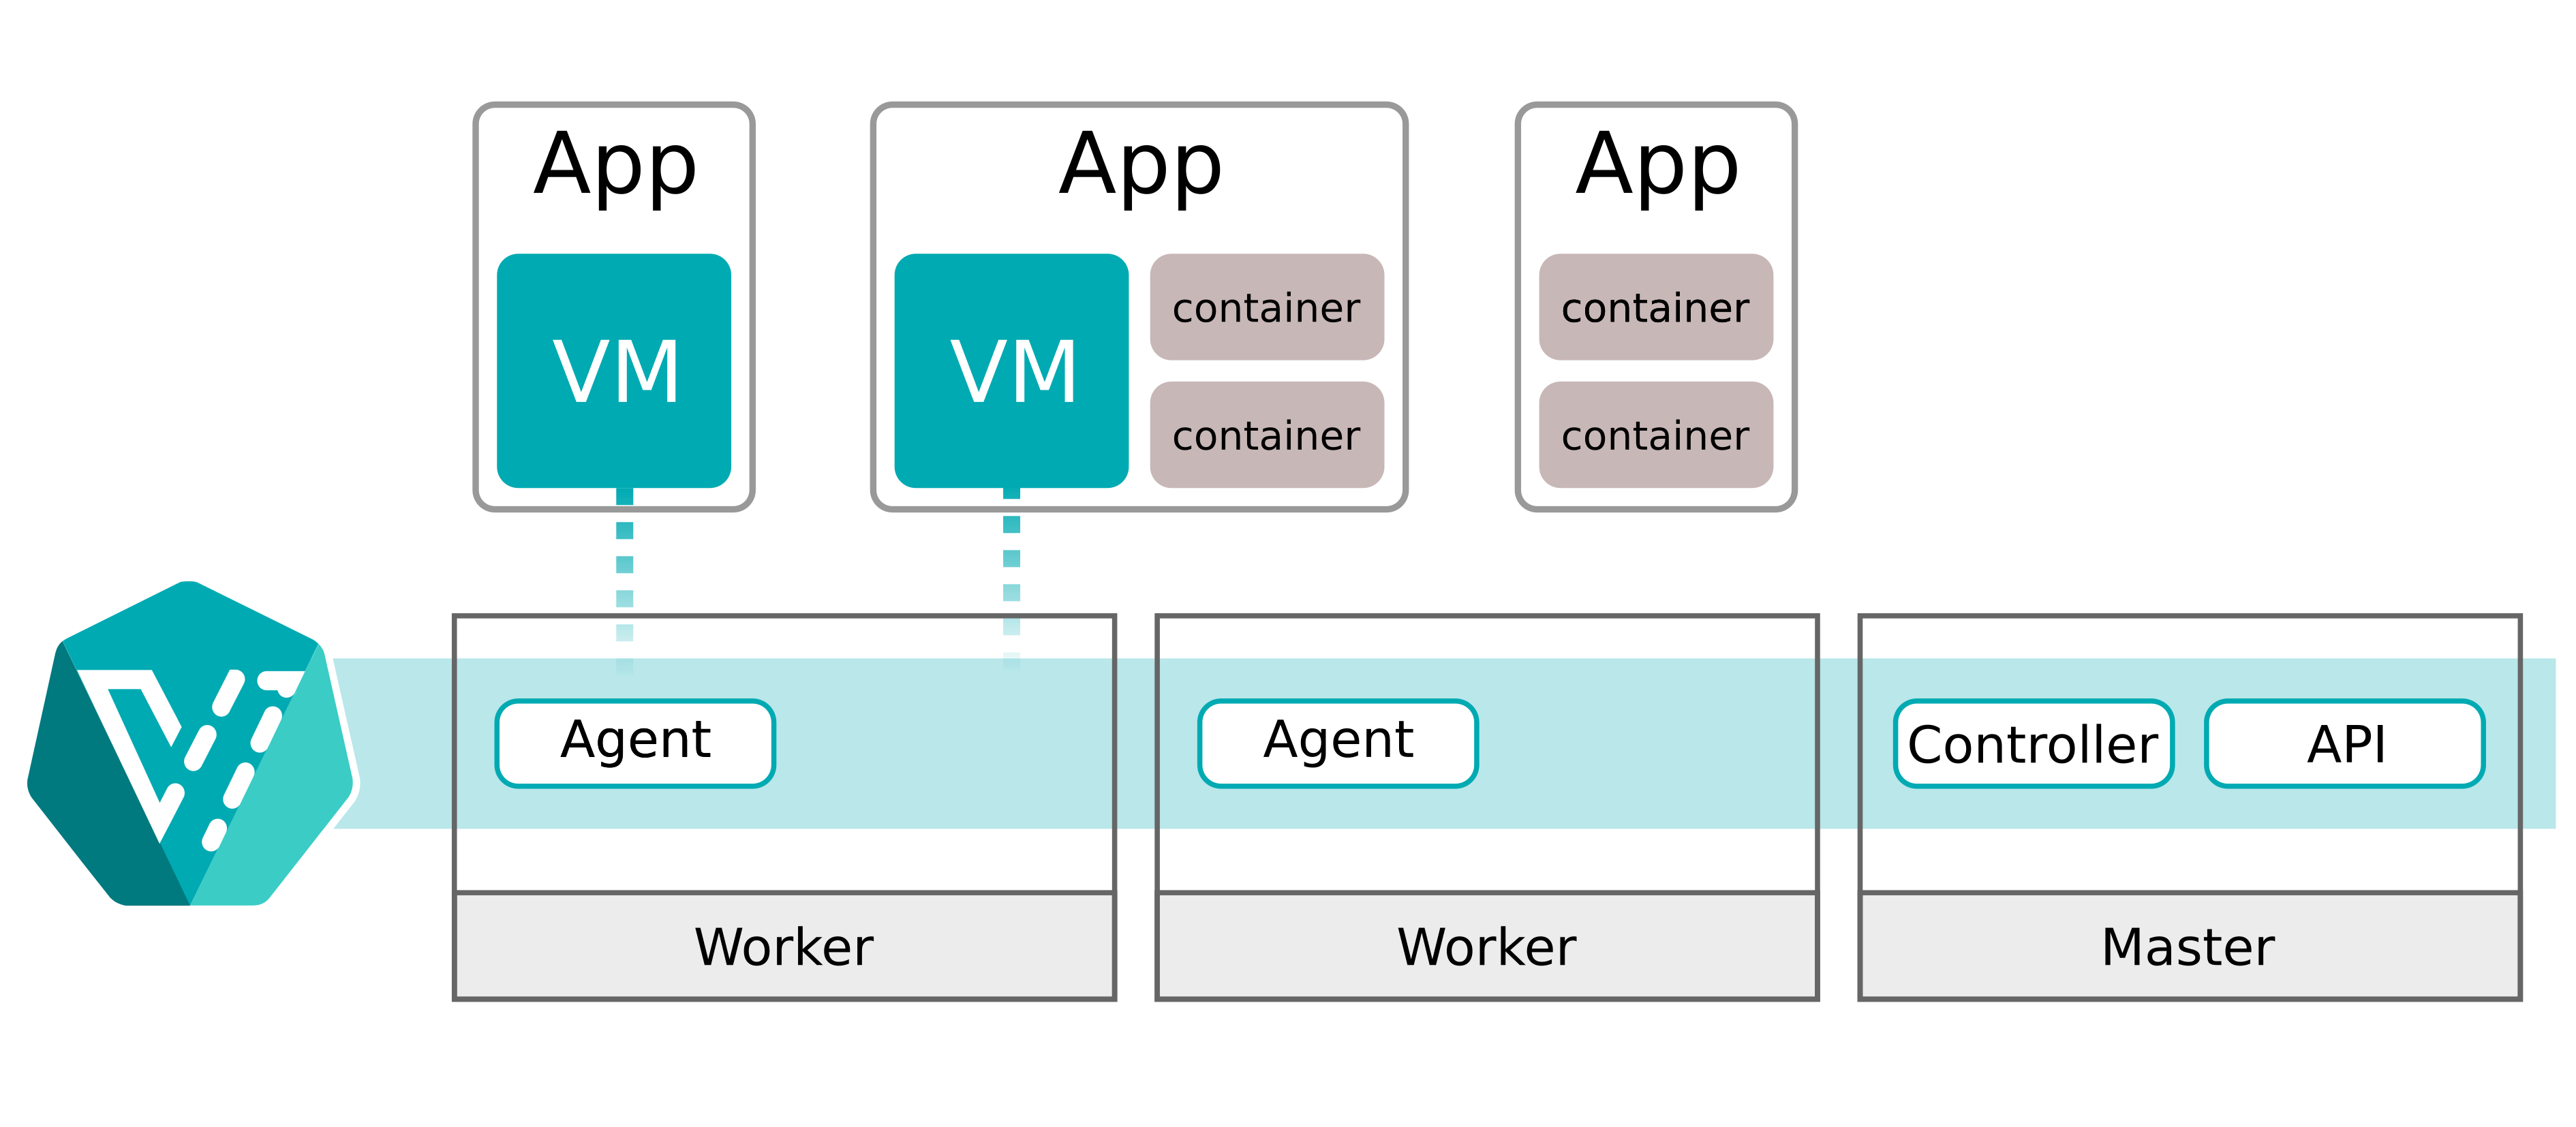
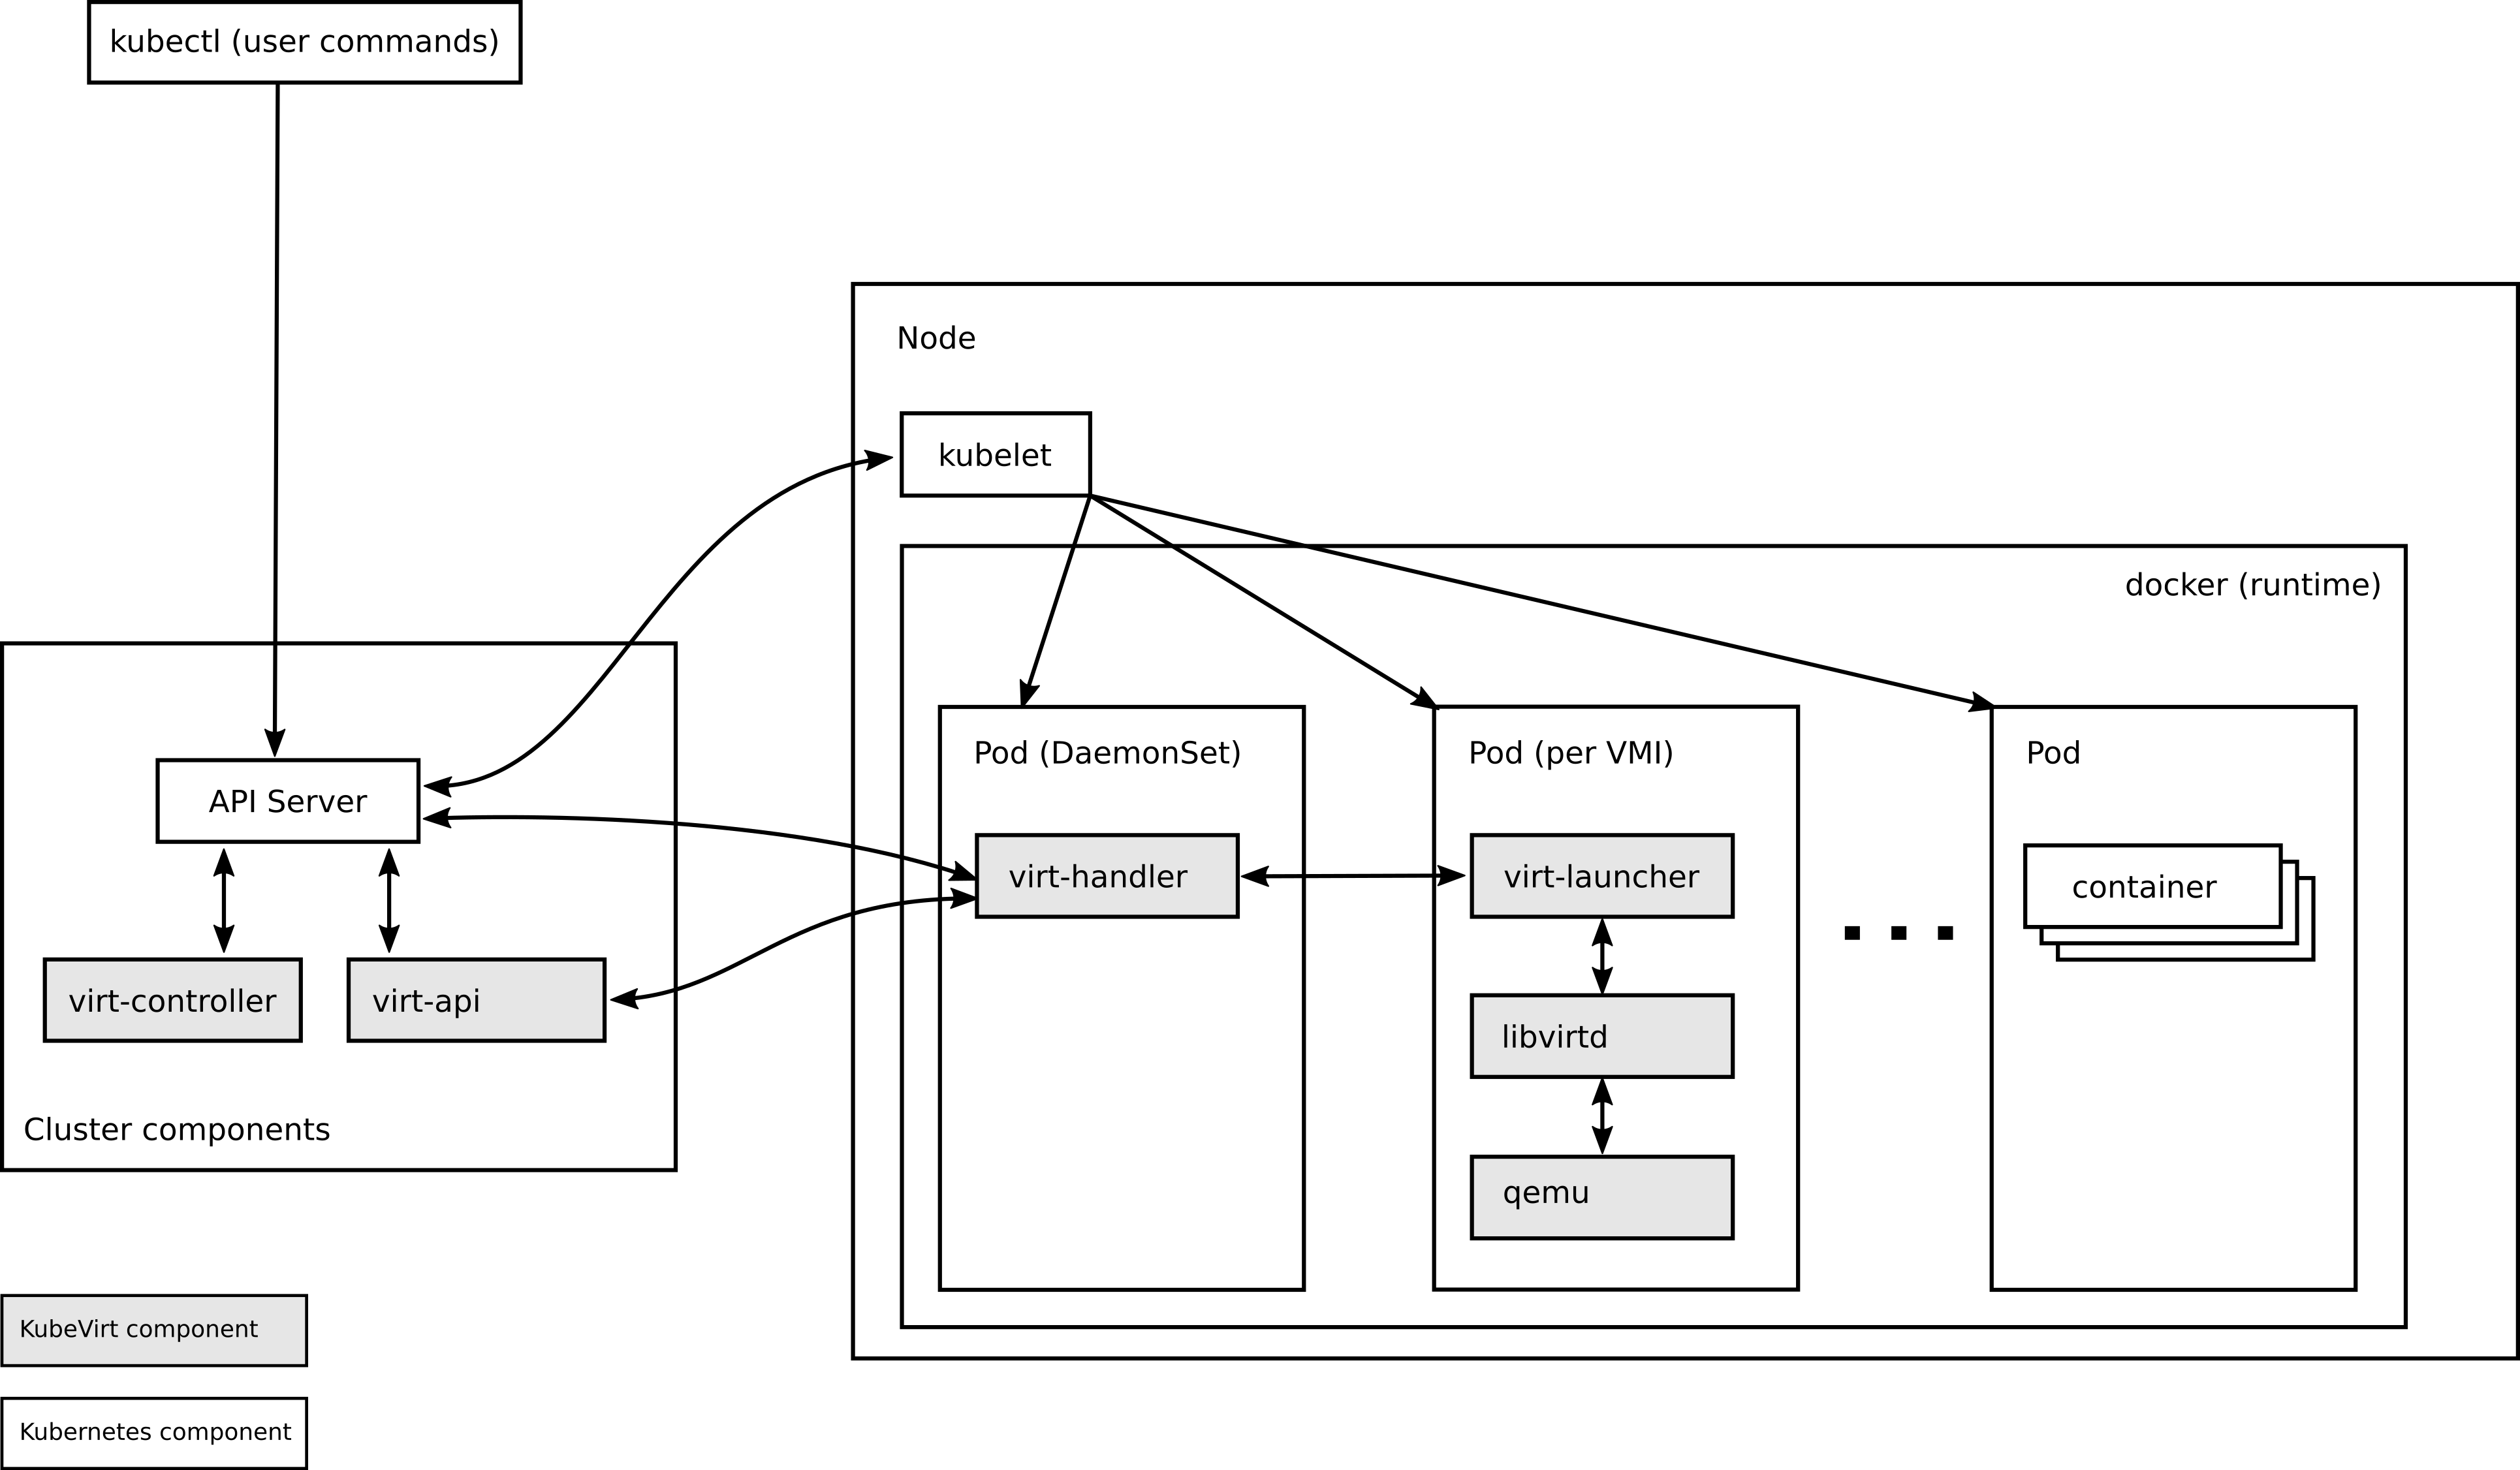
A detailed explanation about KubeVirt can be found on the official KubeVirt website. Simply put, KubeVirt will provide a Controller and API server on the control plane and some Agents on the worker nodes. You can interact with the custom resources via the kubernetes API server which will allow you to interact with the virtual machines. The virtual machines are created via the libvirt daemon which leverages QEMU and the KVM components on Linux.

KubeVirt with libvirt/QEMU/KVM in kind

Before we move ahead make sure to provision the setup on a linux machine, because there you will have access to the libvirt/QEMU/KVM stack. Other platform, e.g. MacOS, might use other hypervisor technology and you could run into issues. More specifically, you might run into kubevirt/issues/11917 on Apple hardware.

Setup kind and KubeVirt

To setup your machine please follow these instructions:

  • Setup kubectl
  • While I generally advocate for the rootless Podman, it is easier to get started with the Docker driver
  • Setup kind
  • Install virtctl a binary from the KubeVirt project to manage the VMs
    • Via Github
      1
      2
      3
      4
      5
      6
      
      export VERSION=$(curl -s https://storage.googleapis.com/kubevirt-prow/release/kubevirt/kubevirt/stable.txt)
      ARCH=$(uname -s | tr A-Z a-z)-$(uname -m | sed 's/x86_64/amd64/') || windows-amd64.exe
      echo ${ARCH}
      curl -L -o virtctl https://github.com/kubevirt/kubevirt/releases/download/${VERSION}/virtctl-${VERSION}-${ARCH}
      chmod +x virtctl
      sudo install virtctl /usr/local/bin
      
    • Via krew
      1
      
      kubectl krew install virt
      
  • Install the libvirt/QEMU/KVM stack for your linux distribution. For Fedora you can find a guide here

Provision kind cluster with KubeVirt

First of all we create a cluster with one control-plane node and two worker nodes:

1
2
3
4
5
6
7
8
cat << EOF > kind-config.yaml
kind: Cluster
apiVersion: kind.x-k8s.io/v1alpha4
nodes:
- role: control-plane
- role: worker
- role: worker
EOF

Then we create a bash script which does the following:

 1
 2
 3
 4
 5
 6
 7
 8
 9
10
11
12
13
14
15
16
17
18
19
20
21
22
23
24
25
26
27
28
29
30
31
32
33
34
35
36
37
38
39
40
41
42
43
44
45
46
47
48
49
50
51
52
53
54
55
56
57
58
59
60
61
62
63
64
65
66
67
68
69
70
71
72
73
74
75
76
77
78
79
80
81
82
83
84
85
86
#!/bin/bash

set -euo pipefail  # Enable strict error handling

# Define color codes
RED='\033[0;31m'     # Red (Errors)
GREEN='\033[0;32m'   # Green (Success)
YELLOW='\033[0;33m'  # Yellow (Warnings)
BLUE='\033[0;34m'    # Blue (Info)
NC='\033[0m'         # No Color (Reset)

# Function to check if a command exists
command_exists() {
    command -v "$1" >/dev/null 2>&1
}

# Ensure required commands are installed
for cmd in kind kubectl curl virtctl; do
    if ! command_exists "$cmd"; then
        echo -e "${RED}Error: '$cmd' is not installed. Please install it before running this script.${NC}"
        exit 1
    fi
done

echo -e "${BLUE}Creating Kubernetes cluster...${NC}"
kind create cluster --config=kind-config.yaml || { echo -e "${RED}Failed to create cluster${NC}"; exit 1; }

echo -e "${BLUE}Fetching latest KubeVirt version...${NC}"
VERSION=$(curl -fsSL https://storage.googleapis.com/kubevirt-prow/release/kubevirt/kubevirt/stable.txt)
echo -e "${GREEN}Using KubeVirt version: $VERSION${NC}"

echo -e "${BLUE}Deploying KubeVirt operator...${NC}"
kubectl apply -f "https://github.com/kubevirt/kubevirt/releases/download/${VERSION}/kubevirt-operator.yaml"

echo -e "${BLUE}Waiting for KubeVirt operator to be ready...${NC}"
kubectl wait --for=condition=available --timeout=120s -n kubevirt deployments -l kubevirt.io

echo -e "${BLUE}Deploying KubeVirt custom resource...${NC}"
kubectl apply -f "https://github.com/kubevirt/kubevirt/releases/download/${VERSION}/kubevirt-cr.yaml"

echo -e "${BLUE}Waiting for KubeVirt to be fully initialized...${NC}"
kubectl wait --for=condition=Available --timeout=300s kubevirt/kubevirt -n kubevirt || {
    echo -e "${RED}KubeVirt deployment failed!${NC}"
    exit 1
}

VM_MANIFEST="https://kubevirt.io/labs/manifests/vm.yaml"
echo -e "${BLUE}Applying Virtual Machine manifest from $VM_MANIFEST...${NC}"
kubectl apply -f "$VM_MANIFEST"

# Show VM YAML if 'bat' is installed
if command_exists bat; then
    echo -e "${BLUE}Displaying VM manifest...${NC}"
    curl -s "$VM_MANIFEST" | bat --language yaml
fi

# Wait briefly for the VM to be registered
sleep 5

echo -e "${BLUE}Starting test VM...${NC}"
virtctl start testvm || { echo -e "${RED}Failed to start VM${NC}"; exit 1; }

echo -e "${GREEN} KubeVirt setup complete. Test VM started successfully!${NC}"

# ---------------------------------------------
# Containerized Data Importer (CDI) Deployment
# ---------------------------------------------

echo -e "${BLUE}Fetching latest Containerized Data Importer (CDI) version...${NC}"
TAG=$(curl -s -w %{redirect_url} https://github.com/kubevirt/containerized-data-importer/releases/latest)
VERSION=$(echo ${TAG##*/})
echo -e "${GREEN}Using CDI version: $VERSION${NC}"

echo -e "${BLUE}Deploying CDI operator...${NC}"
kubectl apply -f "https://github.com/kubevirt/containerized-data-importer/releases/download/$VERSION/cdi-operator.yaml"

echo -e "${BLUE}Deploying CDI custom resource...${NC}"
kubectl apply -f "https://github.com/kubevirt/containerized-data-importer/releases/download/$VERSION/cdi-cr.yaml"

echo -e "${BLUE}Waiting for CDI to be fully initialized...${NC}"
kubectl wait --for=condition=Available --timeout=300s cdi/cdi -n cdi || {
    echo -e "${RED}CDI deployment failed!${NC}"
    exit 1
}

echo -e "${GREEN}CDI setup complete!${NC}"

Experimenting with the containerdisk VM

After executing the above bash script we should have the following nodes:

1
2
3
4
5
$ kubectl get nodes
AME                 STATUS   ROLES           AGE   VERSION
kind-control-plane   Ready    control-plane   22h   v1.32.0
kind-worker          Ready    <none>          22h   v1.32.0
kind-worker2         Ready    <none>          22h   v1.32.0

We have applied the following VirtualMachine to the cluster:

 1
 2
 3
 4
 5
 6
 7
 8
 9
10
11
12
13
14
15
16
17
18
19
20
21
22
23
24
25
26
27
28
29
30
31
32
33
34
35
36
37
apiVersion: kubevirt.io/v1
kind: VirtualMachine
metadata:
  name: testvm
spec:
  runStrategy: Halted
  template:
    metadata:
      labels:
        kubevirt.io/size: small
        kubevirt.io/domain: testvm
    spec:
      domain:
        devices:
          disks:
            - name: containerdisk
              disk:
                bus: virtio
            - name: cloudinitdisk
              disk:
                bus: virtio
          interfaces:
          - name: default
            masquerade: {}
        resources:
          requests:
            memory: 64M
      networks:
      - name: default
        pod: {}
      volumes:
        - name: containerdisk
          containerDisk:
            image: quay.io/kubevirt/cirros-container-disk-demo
        - name: cloudinitdisk
          cloudInitNoCloud:
            userDataBase64: SGkuXG4=

This is a VirtualMachine which uses a containerDisk. A containerDisk is a ephemeral VM disk from a container image registry. We have not claimed any persistent storage with this VirtualMachine. Consequently will a reboot of this VM also result in a loss of all data.

1
2
$ kubectl get pvc
No resources found in default namespace

Despite the fact, that the use of a containerDisk is not the main goal of KubeVirt, we can still use this VirtualMachine to understand the behaviour of KubeVirt components.

There should be a VirtualMachine in Running state:

1
2
3
$ kubectl get virtualmachine
NAME     AGE   STATUS    READY
testvm   22h   Running   True

When a VirtualMachine is running, then there should also be a VirtualMachineInstance with the exact same name testvm:

1
2
3
$ kubectl get virtualmachineinstance
NAME     AGE   PHASE     IP            NODENAME      READY
testvm   20h   Running   10.244.2.16   kind-worker   True

The VirtualMachine is actually running inside the virt-launcher-testvm-65f42 Pod:

1
2
3
$ kubectl get pods
NAME                         READY   STATUS    RESTARTS   AGE
virt-launcher-testvm-65f42   3/3     Running   0          20h

We can now check which processes are running inside this virt-launcher-testvm-65f42 Pod:

 1
 2
 3
 4
 5
 6
 7
 8
 9
10
11
12
13
14
15
16
17
18
19
20
21
22
23
24
25
26
27
28
29
30
31
32
33
34
35
36
37
38
39
40
41
42
43
44
45
46
47
48
49
$ kubectl exec -it $(kubectl get pod -l=vm.kubevirt.io/name=testvm -o custom-columns=':metadata.name' --no-headers) -- ps -ef
UID          PID    PPID  C STIME TTY          TIME CMD
qemu           1       0  0 Feb16 ?        00:00:00 /usr/bin/virt-launcher-monitor --qemu-timeout 312s --name testvm --uid a726afe8-d14f-4930-8240-86b47a25b547 --namespace 
default --kubevirt-share-dir /var/run/kubevirt --ephemeral-disk-dir /var/run/kubevirt-ephemeral-disks --container-disk-dir /var/run/kubevirt/container-disks --grace-period-
seconds 45 --hook-sidecars 0 --ovmf-path /usr/share/OVMF --run-as-nonroot
qemu          19       1  0 Feb16 ?        00:00:24 /usr/bin/virt-launcher --qemu-timeout 312s --name testvm --uid a726afe8-d14f-4930-8240-86b47a25b547 --namespace default 
--kubevirt-share-dir /var/run/kubevirt --ephemeral-disk-dir /var/run/kubevirt-ephemeral-disks --container-disk-dir /var/run/kubevirt/container-disks --grace-period-seconds 
45 --hook-sidecars 0 --ovmf-path /usr/share/OVMF --run-as-nonroot
qemu          31      19  0 Feb16 ?        00:00:02 /usr/sbin/virtqemud -f /var/run/libvirt/virtqemud.conf
qemu          32      19  0 Feb16 ?        00:00:00 /usr/sbin/virtlogd -f /etc/libvirt/virtlogd.conf
qemu          89       1  0 Feb16 ?        00:00:21 /usr/libexec/qemu-kvm -name guest=default_testvm,debug-threads=on -S -object {"qom-type":"secret","id":"masterKey0","for
mat":"raw","file":"/var/run/kubevirt-private/libvirt/qemu/lib/domain-1-default_testvm/master-key.aes"} -machine pc-q35-rhel9.4.0,usb=off,dump-guest-core=off,memory-backend=
pc.ram,acpi=on -accel kvm -cpu Haswell-noTSX-IBRS,vmx=on,pdcm=on,f16c=on,rdrand=on,hypervisor=on,vme=on,ss=on,arat=on,tsc-adjust=on,umip=on,md-clear=on,stibp=on,flush-l1d=o
n,arch-capabilities=on,ssbd=on,xsaveopt=on,abm=on,pdpe1gb=on,ibpb=on,ibrs=on,amd-stibp=on,amd-ssbd=on,skip-l1dfl-vmentry=on,pschange-mc-no=on,gds-no=on,vmx-ins-outs=on,vmx-
true-ctls=on,vmx-store-lma=on,vmx-activity-hlt=on,vmx-activity-wait-sipi=on,vmx-vmwrite-vmexit-fields=on,vmx-apicv-xapic=on,vmx-ept=on,vmx-desc-exit=on,vmx-rdtscp-exit=on,v
mx-apicv-x2apic=on,vmx-vpid=on,vmx-wbinvd-exit=on,vmx-unrestricted-guest=on,vmx-apicv-register=on,vmx-apicv-vid=on,vmx-rdrand-exit=on,vmx-invpcid-exit=on,vmx-vmfunc=on,vmx-
shadow-vmcs=on,vmx-pml=on,vmx-ept-execonly=on,vmx-page-walk-4=on,vmx-ept-2mb=on,vmx-ept-1gb=on,vmx-invept=on,vmx-eptad=on,vmx-invept-single-context=on,vmx-invept-all-contex
t=on,vmx-invvpid=on,vmx-invvpid-single-addr=on,vmx-invvpid-all-context=on,vmx-intr-exit=on,vmx-nmi-exit=on,vmx-vnmi=on,vmx-preemption-timer=on,vmx-posted-intr=on,vmx-vintr-
pending=on,vmx-tsc-offset=on,vmx-hlt-exit=on,vmx-invlpg-exit=on,vmx-mwait-exit=on,vmx-rdpmc-exit=on,vmx-rdtsc-exit=on,vmx-cr3-load-noexit=on,vmx-cr3-store-noexit=on,vmx-cr8
-load-exit=on,vmx-cr8-store-exit=on,vmx-flexpriority=on,vmx-vnmi-pending=on,vmx-movdr-exit=on,vmx-io-exit=on,vmx-io-bitmap=on,vmx-mtf=on,vmx-msr-bitmap=on,vmx-monitor-exit=
on,vmx-pause-exit=on,vmx-secondary-ctls=on,vmx-exit-nosave-debugctl=on,vmx-exit-load-perf-global-ctrl=on,vmx-exit-ack-intr=on,vmx-exit-save-pat=on,vmx-exit-load-pat=on,vmx-
exit-save-efer=on,vmx-exit-load-efer=on,vmx-exit-save-preemption-timer=on,vmx-entry-noload-debugctl=on,vmx-entry-ia32e-mode=on,vmx-entry-load-perf-global-ctrl=on,vmx-entry-
load-pat=on,vmx-entry-load-efer=on,vmx-eptp-switching=on -m size=63488k -object {"qom-type":"memory-backend-ram","id":"pc.ram","size":65011712} -overcommit mem-lock=off -sm
p 1,sockets=1,dies=1,clusters=1,cores=1,threads=1 -object {"qom-type":"iothread","id":"iothread1"} -uuid 5a9fc181-957e-5c32-9e5a-2de5e9673531 -smbios type=1,manufacturer=Ku
beVirt,product=None,uuid=5a9fc181-957e-5c32-9e5a-2de5e9673531,family=KubeVirt -no-user-config -nodefaults -chardev socket,id=charmonitor,fd=20,server=on,wait=off -mon chard
ev=charmonitor,id=monitor,mode=control -rtc base=utc -no-shutdown -boot strict=on -device {"driver":"pcie-root-port","port":16,"chassis":1,"id":"pci.1","bus":"pcie.0","mult
ifunction":true,"addr":"0x2"} -device {"driver":"pcie-root-port","port":17,"chassis":2,"id":"pci.2","bus":"pcie.0","addr":"0x2.0x1"} -device {"driver":"pcie-root-port","por
t":18,"chassis":3,"id":"pci.3","bus":"pcie.0","addr":"0x2.0x2"} -device {"driver":"pcie-root-port","port":19,"chassis":4,"id":"pci.4","bus":"pcie.0","addr":"0x2.0x3"} -devi
ce {"driver":"pcie-root-port","port":20,"chassis":5,"id":"pci.5","bus":"pcie.0","addr":"0x2.0x4"} -device {"driver":"pcie-root-port","port":21,"chassis":6,"id":"pci.6","bus
":"pcie.0","addr":"0x2.0x5"} -device {"driver":"pcie-root-port","port":22,"chassis":7,"id":"pci.7","bus":"pcie.0","addr":"0x2.0x6"} -device {"driver":"pcie-root-port","port
":23,"chassis":8,"id":"pci.8","bus":"pcie.0","addr":"0x2.0x7"} -device {"driver":"pcie-root-port","port":24,"chassis":9,"id":"pci.9","bus":"pcie.0","multifunction":true,"ad
dr":"0x3"} -device {"driver":"pcie-root-port","port":25,"chassis":10,"id":"pci.10","bus":"pcie.0","addr":"0x3.0x1"} -device {"driver":"virtio-scsi-pci-non-transitional","id
":"scsi0","bus":"pci.5","addr":"0x0"} -device {"driver":"virtio-serial-pci-non-transitional","id":"virtio-serial0","bus":"pci.6","addr":"0x0"} -blockdev {"driver":"file","f
ilename":"/var/run/kubevirt/container-disks/disk_0.img","node-name":"libvirt-3-storage","auto-read-only":true,"discard":"unmap","cache":{"direct":true,"no-flush":false}} -b
lockdev {"node-name":"libvirt-3-format","read-only":true,"discard":"unmap","cache":{"direct":true,"no-flush":false},"driver":"qcow2","file":"libvirt-3-storage"} -blockdev {
"driver":"file","filename":"/var/run/kubevirt-ephemeral-disks/disk-data/containerdisk/disk.qcow2","node-name":"libvirt-2-storage","auto-read-only":true,"discard":"unmap","c
ache":{"direct":true,"no-flush":false}} -blockdev {"node-name":"libvirt-2-format","read-only":false,"discard":"unmap","cache":{"direct":true,"no-flush":false},"driver":"qco
w2","file":"libvirt-2-storage","backing":"libvirt-3-format"} -device {"driver":"virtio-blk-pci-non-transitional","bus":"pci.7","addr":"0x0","drive":"libvirt-2-format","id":
"ua-containerdisk","bootindex":1,"write-cache":"on","werror":"stop","rerror":"stop"} -blockdev {"driver":"file","filename":"/var/run/kubevirt-ephemeral-disks/cloud-init-dat
a/default/testvm/noCloud.iso","node-name":"libvirt-1-storage","read-only":false,"discard":"unmap","cache":{"direct":true,"no-flush":false}} -device {"driver":"virtio-blk-pc
i-non-transitional","bus":"pci.8","addr":"0x0","drive":"libvirt-1-storage","id":"ua-cloudinitdisk","write-cache":"on","werror":"stop","rerror":"stop"} -netdev {"type":"tap"
,"fd":"21","vhost":true,"vhostfd":"23","id":"hostua-default"} -device {"driver":"virtio-net-pci-non-transitional","host_mtu":1500,"netdev":"hostua-default","id":"ua-default
","mac":"f6:45:e5:7e:ae:be","bus":"pci.1","addr":"0x0","romfile":""} -add-fd set=0,fd=19,opaque=serial0-log -chardev socket,id=charserial0,fd=17,server=on,wait=off,logfile=
/dev/fdset/0,logappend=on -device {"driver":"isa-serial","chardev":"charserial0","id":"serial0","index":0} -chardev socket,id=charchannel0,fd=18,server=on,wait=off -device 
{"driver":"virtserialport","bus":"virtio-serial0.0","nr":1,"chardev":"charchannel0","id":"channel0","name":"org.qemu.guest_agent.0"} -audiodev {"id":"audio1","driver":"none
"} -vnc vnc=unix:/var/run/kubevirt-private/a726afe8-d14f-4930-8240-86b47a25b547/virt-vnc,audiodev=audio1 -device {"driver":"VGA","id":"video0","vgamem_mb":16,"bus":"pcie.0"
,"addr":"0x1"} -global ICH9-LPC.noreboot=off -watchdog-action reset -device {"driver":"virtio-balloon-pci-non-transitional","id":"balloon0","free-page-reporting":true,"bus"
:"pci.9","addr":"0x0"} -sandbox on,obsolete=deny,elevateprivileges=deny,spawn=deny,resourcecontrol=deny -msg timestamp=on
qemu         156       0  0 14:06 pts/0    00:00:00 ps -ef

Note: To get the full output of ps -ef it is easier to kubectl exec -it ... -- /bin/bash and then obtain the output with ps -ef | more.

Let us elaborate on the above ouput in more detail.

We can see that the container is started with PID 1 from /usr/bin/virt-launcher-monitor which creates another process via /usr/bin/virt-launcher. The virt-launcher created another process via the libvirt QEMU management daemon /usr/sbin/virtqemud. What we can also clearly see is why the libvirt project exists as an abstraction layer. Starting the qemu-kvm with PID 89 with all of the parameters would be a very tough challenge without the libvirt layer in between.

If we want to look at the process tree more compactly, we can use pstree:

1
2
3
4
5
6
kubectl exec -it $(kubectl get po -l=vm.kubevirt.io/name=testvm -o custom-columns=':metadata.name' --no-headers) -- pstree
virt-launcher-m-+-qemu-kvm---5*[{qemu-kvm}]
                |-virt-launcher-+-virtlogd---{virtlogd}
                |               |-virtqemud---18*[{virtqemud}]
                |               `-19*[{virt-launcher}]
                `-7*[{virt-launcher-m}]

We can also leverage the libvirt project so see and understand the running VM.

 1
 2
 3
 4
 5
 6
 7
 8
 9
10
11
12
13
14
15
16
17
18
19
20
21
22
$ kubectl exec -it $(kubectl get pod -l=vm.kubevirt.io/name=testvm -o custom-columns=':metadata.name' --no-headers) -- virsh list
Authorization not available. Check if polkit service is running or see debug message for more information.
 Id   Name             State
--------------------------------
 1    default_testvm   running

$ kubectl exec -it $(kubectl get pod -l=vm.kubevirt.io/name=testvm -o custom-columns=':metadata.name' --no-headers) -- virsh dominfo default_testvm
Authorization not available. Check if polkit service is running or see debug message for more information.
Id:             1
Name:           default_testvm
UUID:           5a9fc181-957e-5c32-9e5a-2de5e9673531
OS Type:        hvm
State:          running
CPU(s):         1
CPU time:       23.1s
Max memory:     63488 KiB
Used memory:    62500 KiB
Persistent:     yes
Autostart:      disable
Managed save:   no
Security model: none
Security DOI:   0

In theory you could also manipulate the VM state with the virsh commands, but this is not the real intention of the KubeVirt project. Nevertheless, we will do that for the sake of our understanding. With virsh destroy <DOMAIN> we can forcefully stop a VM:

 1
 2
 3
 4
 5
 6
 7
 8
 9
10
11
12
$ kubectl exec -it $(kubectl get pod -l=vm.kubevirt.io/name=testvm -o custom-columns=':metadata.name' --no-headers) -- virsh destroy default_testvm 
Authorization not available. Check if polkit service is running or see debug message for more information.
Domain 'default_testvm' destroyed

$ kubectl get pods -w
NAME                         READY   STATUS     RESTARTS   AGE
virt-launcher-testvm-v5h4f   0/3     Init:0/2   0          0s
virt-launcher-testvm-v5h4f   0/3     Init:0/2   0          1s
virt-launcher-testvm-v5h4f   0/3     Init:1/2   0          2s
virt-launcher-testvm-v5h4f   0/3     PodInitializing   0          9s
virt-launcher-testvm-v5h4f   3/3     Running           0          20s

The VirtualMachine will automatically be restarted because we have set the spec.runStrategy: Always with our startup script.

1
2
$ kubectl get vm testvm -oyaml | yq -r '.spec.runStrategy'
Always

We can also access the VirtualMachine with the virtctl console command. Let’s create a file inside the VM:

 1
 2
 3
 4
 5
 6
 7
 8
 9
10
11
$ virtctl console testvm
Successfully connected to testvm console. The escape sequence is ^]

login as 'cirros' user. default password: 'gocubsgo'. use 'sudo' for root.
testvm login: cirros
Password: 
$ touch test.txt
$ uptime
 15:46:49 up 28 min,  1 users,  load average: 0.00, 0.00, 0.00
$ ls
test.txt

Now let us migrate the VM to another node and observe the virtualmachineinstancemigrations:

 1
 2
 3
 4
 5
 6
 7
 8
 9
10
11
12
13
$ virtctl migrate testvm
VM testvm was scheduled to migrate

$ kubectl get virtualmachineinstancemigrations -w
NAME                        PHASE        VMI
kubevirt-migrate-vm-kbtgn   Scheduling   testvm
kubevirt-migrate-vm-kbtgn   Scheduled    testvm
kubevirt-migrate-vm-kbtgn   PreparingTarget   testvm
kubevirt-migrate-vm-kbtgn   TargetReady       testvm
kubevirt-migrate-vm-kbtgn   Running           testvm
kubevirt-migrate-vm-kbtgn   Succeeded         testvm

The migration is completed, which we can also observe on the Pods, as the virt-launcher-testvm-v5h4f on node kind-worker is gone and spawned another one on kind-worker2. The VirtualMachine is still running:

 1
 2
 3
 4
 5
 6
 7
 8
 9
10
11
12
$ kubectl get pods -owide
NAME                         READY   STATUS      RESTARTS   AGE   IP            NODE           NOMINATED NODE   READINESS GATES
virt-launcher-testvm-9ggsf   3/3     Running     0          41s   10.244.1.8    kind-worker2   <none>           1/1
virt-launcher-testvm-v5h4f   0/3     Completed   0          29m   10.244.2.20   kind-worker    <none>           1/1

$ virtctl console testvm
Successfully connected to testvm console. The escape sequence is ^]

$ ls
test.txt
$ uptime
 15:48:10 up 29 min,  1 users,  load average: 0.00, 0.00, 0.00

As pointed out earlier, a restart of the VM will result in a loss of all data due to the containerDisk:

 1
 2
 3
 4
 5
 6
 7
 8
 9
10
11
12
13
14
15
16
17
18
19
20
21
22
$ virtctl restart testvm
VM testvm was scheduled to restart

$ kubectl get pods -w
NAME                         READY   STATUS        RESTARTS   AGE
virt-launcher-testvm-9ggsf   3/3     Terminating   0          6m28s
virt-launcher-testvm-9ggsf   0/3     Completed     0          6m29s
virt-launcher-testvm-4sn54   0/3     Pending       0          0s
virt-launcher-testvm-4sn54   0/3     Init:0/2      0          0s
virt-launcher-testvm-4sn54   0/3     Init:1/2      0          2s
virt-launcher-testvm-4sn54   0/3     PodInitializing   0          8s
virt-launcher-testvm-4sn54   3/3     Running           0          21s

$ virtctl console testvmvm
Successfully connected to testvm console. The escape sequence is ^]

login as 'cirros' user. default password: 'gocubsgo'. use 'sudo' for root.
testvm login: cirros
Password: 
$ ls
$ uptime
 15:54:16 up 0 min,  1 users,  load average: 0.00, 0.00, 0.00

Experimenting with a persistent VM

Now let us take a look at a VirtualMachine which is using a Read Write Once (RWO) persistent storage and a fedora 41 cloud image. This VirtualMachine is relying on the Containerized Data Importer (CDI) installed with the previous bash script. The CDI will import the cloud image into a DataVolume which is an abstraction on top of a Persistent Volume Claim (PVC).

 1
 2
 3
 4
 5
 6
 7
 8
 9
10
11
12
13
14
15
16
17
18
19
20
21
22
23
24
25
26
27
28
29
30
31
32
33
34
35
36
37
38
39
40
41
42
43
44
45
46
47
48
49
50
51
52
53
54
55
56
57
58
59
60
61
62
63
64
65
66
67
apiVersion: kubevirt.io/v1
kind: VirtualMachine
metadata:
  labels:
    kubevirt.io/vm: fedora-vm
  name: fedora-vm
spec:
  dataVolumeTemplates:
  - metadata:
      creationTimestamp: null
      name: src-dv
    spec:
      storage:
        accessModes:
        - ReadWriteOnce
        volumeMode: Filesystem
        resources:
          requests:
            storage: 10Gi
        storageClassName: standard 
      source:
        http:
          url: https://download.fedoraproject.org/pub/fedora/linux/releases/41/Cloud/x86_64/images/Fedora-Cloud-Base-Generic-41-1.4.x86_64.qcow2 
  runStrategy: Always
  template:
    metadata:
      labels:
        kubevirt.io/vm: fedora-vm
    spec:
      domain:
        cpu:
          sockets: 1
          cores: 1
          threads: 1
        devices:
          disks:
          - disk:
              bus: virtio
            name: datavolumedisk1
          interfaces:
          - masquerade: {}
            name: default
        resources:
          requests:
            memory: 2Gi
      terminationGracePeriodSeconds: 0
      volumes:
      - dataVolume:
          name: src-dv
        name: datavolumedisk1
      - cloudInitNoCloud:
          userData: |-
            #cloud-config
            user: fedora
            password: fedora
            chpasswd: { expire: False }
            runcmd:
              - sudo dnf update
              - sudo dnf install httpd -y
              - sudo sed -iE 's/Listen 80/Listen 8080/' /etc/httpd/conf/httpd.conf
              - sudo systemctl enable httpd.service
              - sudo systemctl start httpd.service
              - echo 'This is demo VM 1 :)' > /var/www/html/index.html
        name: cloudinitdisk
      networks:
      - name: default
        pod: {}

This VM has dedicated cpu resources in .spec.template.spec.domain.cpu which are actually the default values. Additionally we are installing httpd, operate it on port 8080 and write our custom index.html file via the cloud-init.

Let’s create the VM and expose a NodePort service:

1
2
3
4
5
$ kubectl apply -f fedora-vm.yaml
$ virtctl expose vmi fedora-vm --name=fedora-http --port=8080 --type=NodePort
$ kubectl get svc
NAME          TYPE        CLUSTER-IP      EXTERNAL-IP   PORT(S)          AGE
fedora-http   NodePort    10.96.225.134   <none>        8080:31538/TCP   22h

We can also reach it with curl:

1
2
$ curl $(kubectl get node kind-worker -ojson | jq -r '.status.addresses[0].address'):$(kubectl get svc fedora-http -ojson | jq -r '.spec.ports[0].nodePort')
This is demo VM 1 :)

This VirtualMachine is now utilizing a persistent storage via DataVolume and PVC:

1
2
3
4
5
6
7
$ kubectl get pvc
NAME     STATUS   VOLUME                                     CAPACITY      ACCESS MODES   STORAGECLASS   VOLUMEATTRIBUTESCLASS   AGE
src-dv   Bound    pvc-66eec301-9ec0-48c9-988f-f3383dbdf2ec   11362347344   RWO            standard       <unset>                 2m37s

$ kubectl get dv
NAME     PHASE       PROGRESS   RESTARTS   AGE
src-dv   Succeeded   100.0%                2m41s

Note: The PVC is RWO, which does not allow us to live migrate the VM between hosts. Thus we had explored the live migration with the containerDisk VM in the previous section.

We will test the persistency of the storage:

 1
 2
 3
 4
 5
 6
 7
 8
 9
10
11
12
13
14
15
16
17
18
19
20
21
22
23
24
25
26
27
$ virtctl console fedora-vm
Successfully connected to fedora-vm console. The escape sequence is ^]

fedora-vm login: fedora
Password: 
[fedora@fedora-vm ~]$ ls
[fedora@fedora-vm ~]$ touch test.txt
[fedora@fedora-vm ~]$ exit 

$ virtctl restart fedora-vm
VM fedora-vm was scheduled to restart

$ kubectl get pods -w
NAME                            READY   STATUS              RESTARTS   AGE
virt-launcher-fedora-vm-4gtvx   0/2     ContainerCreating   0          2s
virt-launcher-testvm-4sn54      3/3     Running             0          27m
virt-launcher-fedora-vm-4gtvx   2/2     Running             0          4s


$ virtctl console fedora-vm
Successfully connected to fedora-vm console. The escape sequence is ^]

fedora-vm login: fedora
Password: 
Last login: Mon Feb 17 16:22:18 on ttyS0
[fedora@fedora-vm ~]$ ls
test.txt
Built with Hugo
Theme Stack designed by Jimmy